Tree of Life Wire Pendant
Required Materials:
28 gauge Vintaj brass wire (approx 4 feet)
4mm round Moss Agate beads (24-30)
34mm brass ring
Needle nose pliers
Round nose pliers
Wire cutters
Cut the 28 gauge wire into 4 inch pieces. You'll need somewhere between 10 and 14 of them, depending on how dense you like your tree. Wrap one end of a piece of wire around the ring three or four times.
Cut off the excess wire flush with the ring, leaving the long end of the wire extended.
Tap the cut end with a needle nose pliers to push it flat against the ring.
Continue adding wires to the right side of the ring. Add between five and seven wires, depending on how much foliage you'd like your tree to have. (I ended up with seven wires on the right side and five on the left.)
Add five to seven wires on the other side of the ring. At this point, your ring should look like it has crazy eyelashes!
Starting in the center and working to the right, add a few beads each to three pieces of wire. You can add anywhere from one to four beads -- it's totally up to you. The randomness is what makes each tree special.
Twist the three wires together to form branches, pushing the beads up toward the top of the ring.
Add beads to another grouping of wires...
... and twist the wires to form a branch.Continue until all your wires have beads and have been twisted into branches. Again, any amount of beads is fine. Any amount of wires is fine. I promise, it works out.
Take the twisted bundles of wires and start twisting them together as well, to form the trunk.
Once all your wires are twisted together, your tree will look something like this.
I like trees with bendy trunks much better. You can use a needle nose pliers or just your fingers to add some fun bend to your tree trunk.
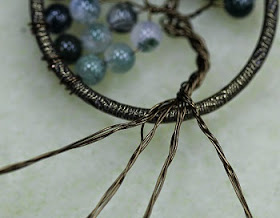
Separate the wires at the bottom of your trunk into four or five twisted groups. These will become your roots.
Wrap each root bundle around the bottom of your ring. You don't have to be very tidy about this, as roots can be gnarly and messy.
It's extra fun if at least one of your "roots bundles" is up in the air a bit before it anchors to the bottom of the ring. Don't you love old trees with roots like that?! Cut off any excess wire and tap the ends down with needle nose pliers.
Open one jump ring...
...and pass it through an opening in the branches. This will become the center top of the pendant, so make sure your tree hangs the way you'd like before you close the jump ring.
Your finished Tree of Life Pendant looks like this!
www.beadworldinc.com


No comments:
Post a Comment